How to Measure for a Suit the Right Way
For many men, making the jump from something bought off the rack to something genuinely designed for their body is the moment they come to realize what style truly is. The confidence boost and comfort that come with a garment that doesn’t “sort of” fit but conforms to the body like a glove is hard to describe but should be experienced!
As the experts in made-to-measure suits, we turned to the Oliver Wicks team to teach us how to create the perfect fit for your suit team to use and help us understand exactly why it matters.
- The Difference Between “Sort of” Fitting and Tailored Suits
- Why Fit Matters
- What Does a Poorly Fitting Suit Look Like?
- How to Measure for a Suit Like a Pro
- The Shoulders
- Sleeve Length
- Biceps
- Wrist Measurement
- Fitting the Neck Size of a Suit
- Measuring Your Chest Size
- Midsection
- Waist Measurement for the Suit Jacket
- Jacket Length
- Back Length
- Measuring Your Waist for Suit Trousers
- Getting the Hip Fit Correct
- The Sit of the Crotch
- The Width of the Thigh
- Measuring Your Knee
- The Outseam
- Inseam
The Difference Between “Sort of” Fitting and Tailored Suits
Why does a tailored and made-to-measure fit matter? If you’re new to the idea of clothes as something stylish, rather than just something you wear in public so as not to scare little children, it might be baffling. Can’t you go to the mall, find a suit that looks OK, try it, and be done?
Well, you could, and if it goes on your body, you can even wear it. However, no two men are made alike. Some of us are broad over the shoulders and narrow at the hips. Some of us wish we were narrow but have a beer bulge to disguise. Maybe you run a long torso and short legs or vice versa – all these change how the same garment looks on us. We really shouldn’t all be wearing the same thing after all! Yet, if 36” pants size and 32” inside leg is all you ever fit, that’s precisely what you’re doing – and you’ll notice jacket size is rarely mentioned.
The suits you buy off the rack (prêt-à-porter, if you want to be fancy) are designed to fit a notional man. He’s Joe Everyman, an aggregate of the average data for men in your area to create a size chart of averages. The idea is that as many men as possible can squeeze themselves into the suit so as many people as possible will buy it.
Yes, the sizing means some variance at the waist and leg length, but it’s extensive strokes. If you’re trying to look your best, broad strokes aren’t good enough. We need fine detail.
Remember, just being able to get into a garment doesn’t mean it fits well. Typically, the worse the fit, the worse the comfort, too, which can have a significant effect on how you feel wearing your suit.
Why Fit Matters
Why is “kind of” not good enough? It’s easy to get caught up in the fashion details prêt-à-porter you want a navy, notch lapel, two buttons, bootleg pants, and a double vent on a three-piece single-breasted suit, right?
It doesn’t matter what fashion statement you want the suit to make. However, if it doesn’t look good through all parts of daily life, we don’t just stand around awkwardly in our suits day-to-day like mannequins. We work and play, and we sit and stand. Maybe you’re very active and always on the move. Maybe you tap your legs or shoot your sleeves a lot.
A suit needs to fit well through all of these movements. Muscles get broader and harder when they tense. Sleeves and pant legs move up and down as we reach or bend. Even sitting can affect how the line of the jacket’s shoulders sits over our shoulders. While it’s OK to tweak your jacket or pull up your pants here and there, if you feel like you have to do it every time you move, that’s an aggravation you don’t need day to day.
Anyone who’s ever watched a mafia-era story has seen the gag about “goons” being too muscular and popping out of their suits. We’ve all seen Hulk rip his way out of Bruce Banner’s suits, too. It’s fun at the cinema, and it’s not so fun when that’s the feeling you’re left with going about your daily business.
The idea is to create a garment that has enough leeway for moving around but doesn’t have fistfuls of excess fabric clogging up your silhouette – and that’s why fit counts most.
What Does a Poorly Fitting Suit Look Like?
So if a good fit isn’t just about physically being able to put the suit on your body, what is it then? What makes a suit you can get into poorly fitted? We’ll look at these areas in detail a little later, but let’s summarize some typical fit issues:
- Shoulders: Shoulders are the most problematic areas to fix on a suit, so a lousy fit here is nearly impossible to remedy. Broad-shouldered men already know the “sausage” feeling of being able to put a suit on but feeling like you will bust out Bruce Banner style at any moment. On the opposite side of the spectrum, we have a saggy, empty shoulder that makes you look gauche and diminishes your visual power.
- Buttons: If your button can’t be done up without looking childishly high on your torso or like you’re about to pop, you have a problem. Weird creases on the jacket when fastened are another clue that something’s not right. If you have to unbutton the coat to bend comfortably, that’s also a fit issue.
- Chest: Again, broader-chested men know what the Hulk feels like the split second before the suit pops off him. Other issues include gaping between the jacket and shirt and skin (or fat) popping out where you least want it.
- Jacket: We can’t get free of the coat, can we? Are you starting to get the idea that a million tiny things go into fitting a suit properly? Well, that’s what we’re here for today, after all! Jacket length matters too. Too long, you look childish. Too short, like you’re going to bust or launch your rap career. Either-or.
- Back: Rolls of fabric or weird creases on the back of the jacket are a vital sign all is not well with this suit. You’re going to spend half your life pulling at this jacket instead of working on your next promotion.
- Sleeves: Too long? Too short? You look silly both ways.
- Collar: Heard the phrase “hot under the collar?” That shouldn’t be you! Your collar should fit smoothly and sophisticatedly, not like you’re wearing your granddad’s suit.
- Rear: Do the back of your pants kind of sag and hang? Do you feel like it’s about to tear? Not a good look either way!
- Pockets: Flappy pockets are not cool. Enough said. If you’re walking around with bunny ears hanging off your hips, pull up a chair, grab a tape measure, and get fitting!
- Legs: Pant’s legs are something many people do fit well, but to mention, they shouldn’t leave a gap between pant and shoe, nor should you have acres of excess fabric rolling around your ankles.
As you can see, some of these details are small, but the impact on how you look and how comfortable you feel is enormous. You’ve probably never considered fitting your collar, yet imagine how uncomfortable a chokingly tight collar would be – how having oodles of fabric leftover will be scratchy and uncomfortable.
A suit that “kind of” fits is not in your future, and that’s why the Oliver Wicks team is here! So, let’s take an area-by-area look at how to measure for a suit, so you never have to worry about fit problems again.
How to Measure for a Suit Like a Pro
Before we begin, let’s gather what you will need:
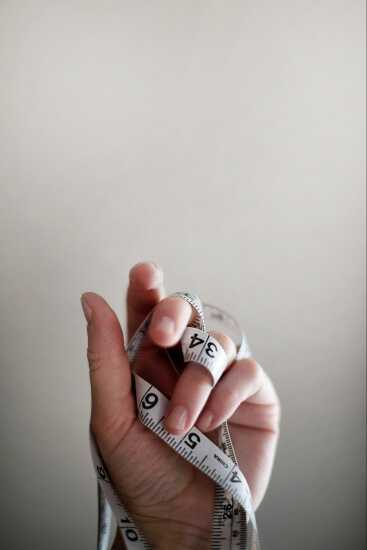
- A measuring tape: If you’re using a service like Oliver Wicks to make your suit, make sure you know what unit they prefer measurements in. For Oliver Wicks, it’s cm. This makes sure there are no miscommunications or conversion errors along the way. We’d also suggest a quality tailor’s tape measure. They’re cheap to buy. You weren’t going to dig this out of your toolbox. We want something soft like fabric, not a complex DIY tape measure. You also want something that you are confident is accurate – some cheaper Chinese import tape measures can be frighteningly off. Check it against a trusty ruler before you spend the effort measuring.
- A friend: This will be 100 times easier with a friend to measure the awkward bits. While it’s not impossible to do yourself, contorting and twisting will make the likelihood of a mistake far bigger and doesn’t give an accurate picture. For example, twisting to measure one shoulder will likely harden the muscles, appearing bigger when measured. Bribe a friend or spouse to help.
- Yourself: Make sure you’re in the mood to invest a little time in yourself. If it’s been a long day and you want to sleep, leave it until a better day. Try to pick a day when you’re feeling pretty average, too. If you ate three pizzas and drank a brewery of beer watching your team yesterday, your measurements will be affected. Likewise, don’t just do it the day you feel your leanest. Take an average day. We recommend measuring later in the day. You want to be able to wear your suit comfortably all day. Throughout the day, we eat, drink, and get hot or cold… you’ll get a more realistic idea of your comfortable size if you measure in the afternoon.
- A notebook: Even with a friend, you’re not going to remember everything accurately. Write it down, use an app...whatever works for you. Be sure to note where you were measuring!
- A good shirt: If you have a great shirt that fits immaculately, some of these measurements will be easier to visualize if you wear it. If you don’t have a shirt you love the fit of, however, don’t worry. We’d still suggest grabbing a dress shirt out of your wardrobe so you can more easily imagine some of the seam locations we’re talking about, but don’t put it on. Use it as a visual reference where we discuss seams.
- Dress shoes: If you have a favorite pair of shoes, dig them out. Make it a leather dress shoe or a loafer if you have to rather than a trainer. The bulk at the top of a trainer and lack of rising at the back will interfere with a critical measurement.
- Your best pair of dress pants: Please wear pants, or your friend will run away! Make it the very best fitting pair of pants you own so you can get high-quality measurements. If it’s still not a comfortable fit, take note of the areas you aren’t happy with.
Onward to the fitting we go!
The Shoulders
We’re going to do this shoulder measurement in two steps. As we mentioned earlier, it’s one of the most complex parts to tailor, tweak, or fix on mens’ suit jackets. This means it’s imperative to get all these measurements as accurate as possible. Remember the old advice to measure twice!

Two Shoulders
Firstly, we’re going to measure across both shoulders. You measure from point to point across the shoulder. If you have a shirt you know fits well, put it on. Pop the collar, so it doesn’t interfere. We want the measurement from the shoulder and arm seams to meet on one side, over the back below your collar, to the other side. It demonstrates your full shoulder width.
If you’re not sure about your shirts, measure with a bare chest. Imagine you were standing with an Olympic barbell resting on your shoulders. That’s the line to take across your back. Make sure you stand correctly but relaxed, without hunching your shoulders and without tension. Imagine the arm seam we describe. Measure from that point on the shoulder, over the back, to the corresponding point on the other side.
How to measure for two shoulders video demonstration
One Shoulder
Again, if you have a well-fitted shirt, use it. Pop the collar. Do you see that short seam running from the point of the shoulder, straight over the top of the shoulder, to the end at the collar? That’s the measurement we’re taking. Even if you don’t have a shirt that fits as you’d like, take a look at this seam on a man’s shirt (or watch our super helpful video), so you know exactly where to measure.
How to measure for one shoulder video demonstration
Sleeve Length
Let’s continue down the arm for the jacket sleeve. Relax your hands naturally at your side. Now shake them out! We can guarantee you were overthinking it and had some tension! Now let your arms hang naturally. This measurement runs from, once again, the very point of the shoulder (that shoulder-meets-arm seam on a well-fitted shirt) to your wrist.
If you have a well-fitted shirt, it’s easy. The other point should stop precisely at the edge of your cuff. If you don’t have a good shirt, take the measurement not precisely at the very joint but ever so slightly below it because a cuff doesn’t stop right at the wrist line.
How to measure for sleeve length video demonstration
Biceps
We’ve reached a measurement that’s key to the feel-good factor in your suit. It’s the one area that’s often lacking in off-the-peg suits, especially if you enjoy the gym. There’s nothing worse than having a constant constriction across the biceps as you try to live your daily life.
For the first time in our guide on measuring for a suit, we’re not going to take a neutral, relaxed stand. Bend your arm up to 90 degrees. Don’t tense up your fist; let that stay relaxed, or it will not allow you proper bicep flexion. Flex the muscle hard. Make the measurement snug but with allowance for one finger’s room under the tape – just in case!
How to measure for biceps video demonstration
Wrist Measurement
Now, you will measure your wrist right at the fullest part. For most people, this is the exact point where the wrist and hand meet. If you have a very prominent bump on your wrist bone or have broken the wrist on one side, make sure to take that into account. There’s a catch, though! Get your friend to stick one finger under the tape and take that measurement. We’re fitting for a suit, not a body stocking, so you’ll see this little allowance a lot.

How to measure for wrist video demonstration
Fitting the Neck Size of a Suit
Where do you like a shirt collar to sit when it’s buttoned? Ideally, it should be on, or just below, your Adam’s apple. That’s the next measurement. Again, have your friend stick a finger between you and the tape, so it’s a gently loose measurement.
You have to behave for this measurement! If you fidget, look down or up, or try to supervise, this one is going to be wrong. Stand neutrally, shoulders back and relaxed, weight equal on both feet, and look straight ahead. If you want to see anything, use a mirror at eye level.
So far, so good! We’ve got a realistic picture about how the sleeves and the very top of the jacket should fit. On to the chest!
How to measure for the collar video demonstration
Measuring Your Chest Size
Your chest measurement is another critical measurement, so check and double-check. You need the stance we mentioned above. Make sure your shoulders are level, and your weight is evenly distributed on your feet, too. Don’t puff out your chest, but don’t hold your breath either!
Measure with the finger trick again, and don’t have them draw the tape super-tight against you – friendly and comfortable like you’d like the actual suit to be. The line to take here is under the armpits and across the nipple area for most men.
How to measure for the chest video demonstration
Midsection
We haven’t reached the stomach yet! Still in the neutral, straight, relaxed stance of earlier, move to just under the ribcage. This is neither your natural waist nor your stomach – it’s right at the base of the ribs. Leave room for one finger, and make it snug but not uncomfortable. Remember to breathe naturally!

How to measure for the midsection video demonstration
Waist Measurement for the Suit Jacket
We know waist size is a sensitive area. Don’t be shy, though. It doesn’t matter if it’s a little more bulge than you’d like or if you wish you could pick up a little weight. We’re not here to judge you for not having a Greek god’s figure. We’re here to help you look stylish and sophisticated as you are, but we do need a direct measurement to do it!
Most of us are at our broadest right at the level of the belly button. You might be slightly different, so adjust accordingly. Make it snug, but not tight, with one finger’s allowance once again.
We’re almost there! It’s a lot, we know, but by building this picture of you through key fit points, you can get a made-to-measure Oliver Wicks garment that’s fitted beautifully. No more itchy collars, weirdly creased backs, and too-short sleeves that pinch your arms. It’s worth it – we promise!
Talking about backs, let’s add a couple of jacket-length measurements to the pile. Since we measured your stomach already, you can treat yourself to a drink before we finish up.
How to measure for the waist video demonstration
Jacket Length
If you’re using a well-fitted shirt, pop the collar again. We’re going to start at that collar seam but not at the spine, as you may imagine! The tape measure is going to come down your body over the front. Your starting point is where the collar seam and that short shoulder seam in the “one-shoulder” section meet – sort of like one side of braces if that mental image helps! Don’t forget to check the video for extra guidance.
Make sure you’re back in the power stance we’ve been using. To recap: relaxed, even shoulders and evenly distributed stance, standing tall, looking directly forward at a point within your eye line. Arms have to hang naturally for this. Give them another shakeout to make sure. This is another critical measurement, so don’t blow it!
Smooth the tape down your body. You’re going to stop the measurement at your thumb knuckle height, but don’t let the tape drift over to your hand, or it will be artificially long! The tape is running from that seam point to the middle of your thigh, straight down the body, like weirdly long braces, remember?
We ask you to measure this point whether or not you want a trendy jacket length, but do mention that to the tailor when you submit if that’s the case.
How to measure for jacket length video demonstration
Back Length
Now that we’ve got the overall jacket length nailed, let's fit the back. This measurement isn’t as critical as the other length measurement. It’s most helpful if you’re ordering a vest, as it demonstrates body length, but we still encourage you to take it if you measure for a suit. It helps the Oliver Wicks team get a better overall idea of your shape, and it can be a valid “check” to make sure the other length measurement is realistic.
This time, we will measure from the collar seam down the spine, and it will stop at the top of your belt or waistband when wearing pants. Typically, this is the natural waist on most men, though some bodies are different.
We’ve now created all the measurements for a fantastic jacket or blazer. Let’s add the suit pants to the mix!
How to measure for jacket back length video demonstration
Measuring Your Waist for Suit Trousers
While we did take some body measurements for the suit jacket, they will look a little different for the pants. Make sure you are back in that relaxed and even stance. Don’t suck in your stomach! Stand normally, without it tensed or blown out, and measure the point your pants will sit on the body. Make it snug but not uncomfortable, and use the one-finger allowance.
How to measure for pants waist video demonstration
Getting the Hip Fit Correct
Now we move down to the hips. It’s a measurement that will either make you giggle or feel a little uncomfortable, but don’t be shy! This measurement helps a made-to-measure suit creator like Oliver Wicks shape the seat and fly of your pants correctly, so it’s essential to get right! Make sure you don’t feel unnaturally tense the buttocks for this one – it’s back into the power stance you go.
The widest part of the hips is always a little difficult to imagine on a male body – it’s far easier to spot on a female shape. However, it will be roughly in the vicinity of the point of your hip bones and sit directly at the most prominent end of the buttocks. The video will be a great help for this measurement.
How to measure your hips video demonstration
The Sit of the Crotch
Let’s face it – these are all somewhat uncomfortable measurements, but we must suffer for an excellent suit! The result will be worth it. This critical measurement goes from the top of the pants/belt at the front of the body, through the legs, to the same point at the back, effectively running down the fly and up the middle seam. It should be snug, without feeling like a wedgie in progress. Since you’re wearing pants (you are wearing pants, right?), make sure not to let them influence your measurement here, and instead, get a natural snug feel. Use the one-finger allowance again.
How to measure the crotch video demonstration
The Width of the Thigh
Like the bicep, this is an important measurement to help account for a very big muscle. While you probably won’t be doing squats in your new suit, you do want it to fit comfortably at the thigh as you move through your day and sit at your desk. Take this measurement around the thigh at its widest point, typically right at the inseam or close to it. Make it snug but comfortable, with one finger’s allowance.
How to measure your thigh video demonstration
Measuring Your Knee
There’s nothing complicated about this one. Do the same as you did from the thigh but at your knee. The only thing to watch out for here is that you don’t bend the knee and that you’re standing naturally, not rigidly on parade! It’s a good idea to check you aren’t shifting your weight onto the leg being measured accidentally, as this can artificially tighten muscles in the area.
How to measure your knee video demonstration
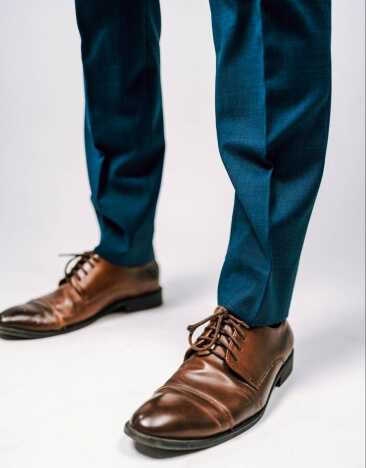
The Outseam
Now we measure the overall length of the pants. Here’s a little lesson in pant lengths.
It’s time to introduce you to the “pant break.” Very little difference in the length of your pants can have a profound effect on your overall look, and it’s pretty amazing how tiny the fit difference can be. The “pant break” itself is a subtle little semi-fold at the front of the pants, while the back hangs straight down to your shoe.
Pants that hang straight without them used to be seen as too short. Today, on a slim-fit office suit, you can get away with a pant break that touches the top of the shoe without showing socks. There will be no crease, but you do not see ankle and sock, either. It’s called having no break.
Not touching at all (negative break) is a no-no. It will make you look very much like Steve Urkel – not a look a suave man wants! Be careful with this if you’re a man who often crosses his legs, or who has a very long leg (especially calf) length, as you can inadvertently look gauche if they pull too far up when sitting, although it is acceptable to show a little sock with crossed legs.
A half-break is probably the safest bet for a man who doesn’t know which way to go. It’s a more modern look, works well on slimline contemporary styles, and has a tiny touch of a fold – no sock visible and a bit of fabric pooling on the top of the foot.
A complete break is the most traditional look, where there’s a defined pant break and a fair amount of pooling. Typically, the length reaches halfway down the counter of the dress shoe (wait for an explanation of that one – it’s easy; we promise). It’s excellent on classic fit or casual pants styles and for more traditional men, but it has to be done right. You don’t want a pileup of fabric here, either. It will make a tall man look short, and everyone else looks like a child.
Now let’s talk about counters. The “counter” is the rise of the back of the shoe – the back seam if you will. We do recommend wearing dress shoes for this because their counter is usually a little higher. Loafers tend to sit a touch lower, but you can make this measurement with loafers if you need to.
So, before you take this measurement, you need to have some idea what pant break you’re looking for. If you’re stuck, take a picture of this measurement, with the tape in the picture, wearing your dress shoes, to send with your measurements so the tailor can see exactly where the height sat when you made it, and chat it over with them.
If you happen to have a pair of well-fitting trousers with a leg that fits perfectly for you, we’d advise measuring with them and your dress shoes. Of course, if your pants don’t work well, don’t use their measurements!
The measurement itself is super simple. Stand straight and evenly balanced, as we’ve been doing. Go down the pants' real or imaginary side seam, from the belt to the bottom of the pants, and you’re done!
How to measure for pants outseam video demonstration
Inseam
The very last measurement is the easiest of all. You’re simply going to go from the crotch of your pants, down the seam on the inside of the pants, to the equivalent pant breakpoint on the inside of the shoe. We’re just getting a sense of the difference between the outside and inside pant seam, depending on how long you are in the body and seat.
There you have it! With this collection of measurements, the team at a made-to-measure custom suit tailor like Oliver Wicks can get a very realistic idea of your unique body. Instead of being stuck with something right, your suit can be shaped to your natural body and its unique quirks. This means you will be able to work, play, stand, sit, and move without pinching, chafing, creeping, or creasing. Your suit should fit your lifestyle, after all.
Remember, if you have any problems with any of these measurements, our handy video series on how to measure for a suit will help. Likewise, you’re always welcome to get in touch with the Oliver Wicks teams with any queries or concerns.